Version Control in the Age of Agentic AI
Andromeda Workshop
Introduction
Introduction
- Bas Machielsen (a.h.machielsen@uu.nl)
- Assistant Professor in Applied Economics at Utrecht University
- Teaching: data science and empirical methods (BSc & MSc)
- Research: economic history & political economy — machine learning and AI applied to historical documents
Outline
Concepts & tools
- What is Agentic AI?
- Claude Code and OpenCode
Version control
- Git from scratch: concepts, setup, visual interface
- Git fundamentals: diff, log, conflicts
- Git + Agentic AI: a powerful combination
Running models
- Local models (Ollama) and free cloud options
What is Agentic AI?
From Chatbots to Agents
- Traditional LLMs answer one question at a time:
- You ask → model replies → done
- Agents operate in a loop:
- Receive a goal → make a plan → use tools → observe results → repeat
What makes an AI agent?
An agent is an AI system that can perceive its environment, reason about what to do, act through tools, and iterate on the results — all without step-by-step human guidance.
The Coding Agent Loop
You describe a task in plain English
       ↓
Agent reads your codebase (file tree, key files)
       ↓
Agent plans: what files to change, what commands to run
       ↓
Agent edits files, runs tests, reads output
       ↓
Agent fixes errors, re-runs, iterates
       ↓
Agent commits result to git — you review the diff
Why Now?
- Models crossed a threshold of code reasoning quality around 2023–2024
- Tool use / function calling became reliable in frontier models
- Context windows grew large enough to hold entire small codebases
- Result: agents that autonomously handle tasks taking humans hours
Why does this matter for you?
You do not need to be a software engineer to benefit. If you write R or Python for data analysis, a coding agent can help you refactor scripts, find bugs, write documentation, and manage your git history — all from plain English.
Two Leading Tools
| Feature | Claude Code | OpenCode |
|---|---|---|
| Provider | Anthropic | Open-source community |
| Cost | Subscription / API | Free (with free models) |
| Models | Claude (default) | 75+ providers |
| Local models | Via providers | Full Ollama support |
| Privacy | Proprietary | No data stored |
Both support: CLAUDE/AGENTS.md, git integration, GitHub PRs, subagents.
Claude Code
What is Claude Code?
- Anthropic’s official agentic coding assistant
- Available on:
- Terminal — runs anywhere you have a shell
- VS Code / Cursor / JetBrains — IDE extension
- Desktop app — macOS and Windows
- Web — no local install required at
claude.ai/code
- Reads your entire codebase, edits files, runs shell commands
Key Features
- Multi-file editing — understands your whole project, changes what is needed
- Git operations — stages, commits with descriptive messages, creates branches, opens PRs
- CLAUDE.md — committed to your repo; contains instructions and coding standards loaded every session
- Custom slash commands —
/review-pr,/deploy-staging, shareable across teams - Subagents — spawn parallel Claude instances for different parts of a task
Getting Started
Sign in with a claude.ai Pro/Max account, or set an API key:
VS Code: install the Claude Code extension from the marketplace.
Persistent Memory: CLAUDE.md / AGENTS.md
The key insight: git as long-term memory
Every session starts fresh. These files give the agent durable context: coding conventions, architecture decisions, which files to avoid, what tests to run. Commit them to git — they travel with your project.
Git Integration in Claude Code
Claude Code treats git as a first-class citizen:
- Automatically creates feature branches for tasks
- Writes descriptive commit messages (“Fix NA handling in wage variable before merge”)
- Reads
git logat session start to understand recent history - Opens pull requests on GitHub with summary and test plan
- Can be triggered from GitHub Actions for automated PR review or nightly analysis
OpenCode
What is OpenCode?
- Fully open-source agentic coding tool (github.com/sst/opencode)
- 120 000+ GitHub stars, 5 million monthly users
- Supports 75+ LLM providers: Claude, OpenAI, Gemini, Mistral, Groq, DeepSeek — and local models via Ollama
- Privacy-first: your code goes directly to whichever model you choose — OpenCode stores nothing
- Available in terminal, desktop app (beta), and IDE extensions
Key Features
- AGENTS.md — same concept as CLAUDE.md; committed to git for persistent agent context
- Git-backed session review — view uncommitted changes and branch diffs inside the tool
- GitHub Actions — add
.github/workflows/opencode.ymlto automate agent tasks in CI/CD /connectcommand — interactively add provider API keys- Parallel agents — start multiple agents on the same project simultaneously
- Session sharing — share a link to a debugging session with a collaborator
Getting Started
On first run, OpenCode prompts you to connect a provider with /connect.
Configuration
OpenCode is configured with an opencode.json file in your project root:
Provider credentials: run /connect <provider> inside OpenCode — never hardcode keys in the config.
Git from Scratch
The Problem Git Solves
Tip
Already use git daily? This section is a quick visual refresher — the agent-specific patterns come next.
Have you ever done any of these?
- Saved
analysis_final.R, thenanalysis_final2.R, thenanalysis_FINAL_v3.R - Accidentally deleted code you later needed
- Shared a script by email and lost track of who changed what
- Broken something that used to work, with no idea what changed
Version control is the solution — and git is the tool everyone uses.
What is Git?
- The most widely used version control system in the world
- Works entirely on your machine — no internet required (until you want to share)
- Tracks any text files: R scripts, Python, Quarto documents, LaTeX, config files
| Term | Meaning |
|---|---|
| Repository (repo) | A folder tracked by git |
| Commit | A saved snapshot of your files at a point in time |
| Branch | An independent line of work within a repo |
| Remote | A copy of the repo hosted online (GitHub, GitLab) |
Git vs GitHub
Two different things
Git runs locally on your machine — it is the version control tool.
GitHub is a website that hosts git repositories online — where you push commits to back them up or collaborate with others.
You can use git without GitHub. GitHub is just a convenient remote storage and collaboration platform.
First-Time Setup
Tell git who you are (once, on each computer):
Start tracking a project:
That’s it. Your folder is now under version control.
The Three Zones
Every file in a git project lives in one of three places:
Working tree           Staging area          Repository
(your files)          (the "index")         (git history)

  Edit file     →   git add filename   →   git commit
The two-step process (add then commit) lets you craft clean, logical commits even when you have changed many files at once.
The Basic Daily Loop
Good commit messages
Write in the imperative mood: “Add regression table”, not “Added” or “Adding”. Keep it under 72 characters. Future you (and future agents) will thank you.
Using Git Visually in VS Code / Positron
You do not need to memorise commands — VS Code and Positron have a built-in Source Control panel:
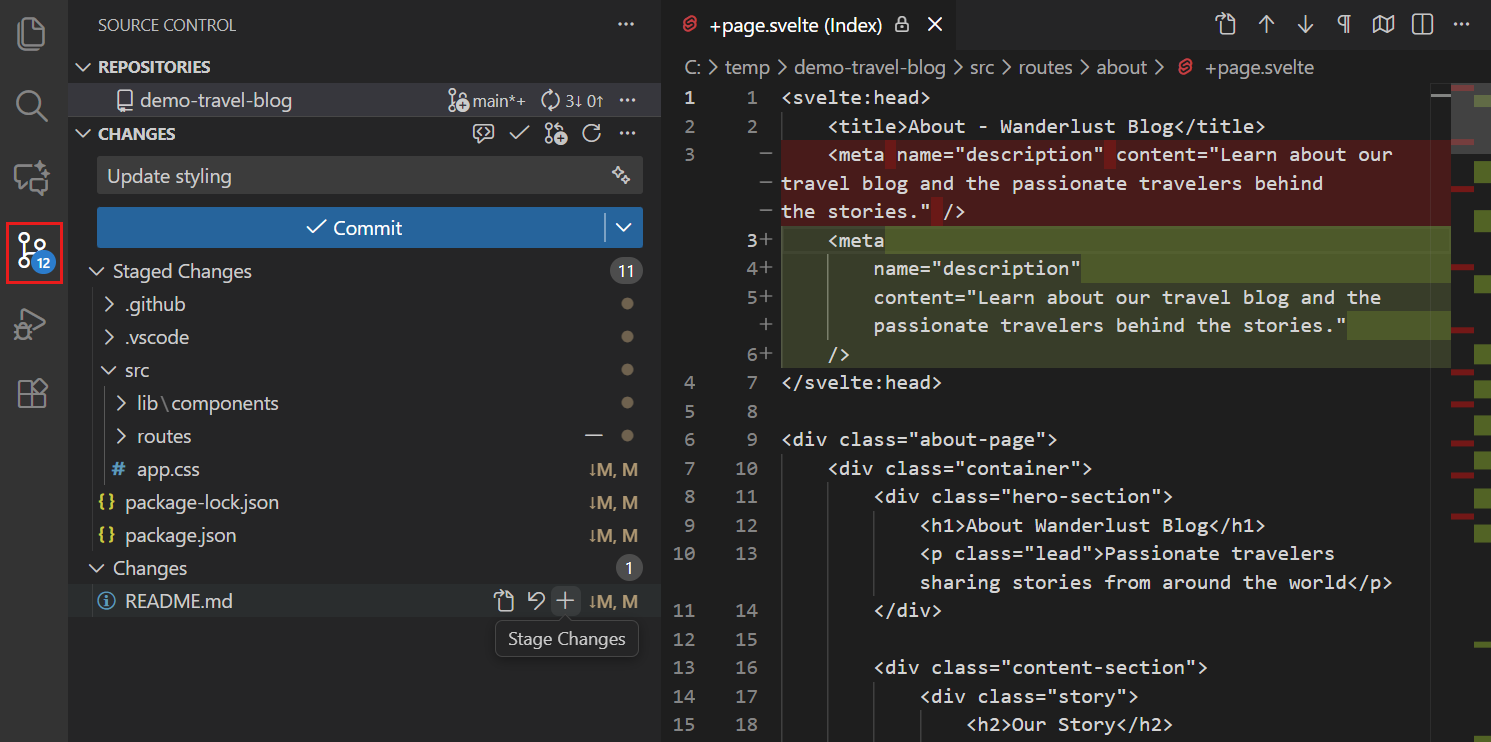
VS Code Source Control panel
Tip
Open with Ctrl+Shift+G (Windows/Linux) or click the branch icon in the left sidebar.
How to Stage and Commit in the UI
- Edit a file — it appears under Changes
- Click + next to the file to move it to Staged Changes
- Type a commit message in the box at the top
- Click ✓ Commit (or press
Ctrl+Enter) - Click Sync to push to GitHub
The ... menu gives access to pull, push, create branch, stash, and more — all without the terminal.
Viewing Changes Visually
Click any changed file in the Source Control panel to open a diff view:
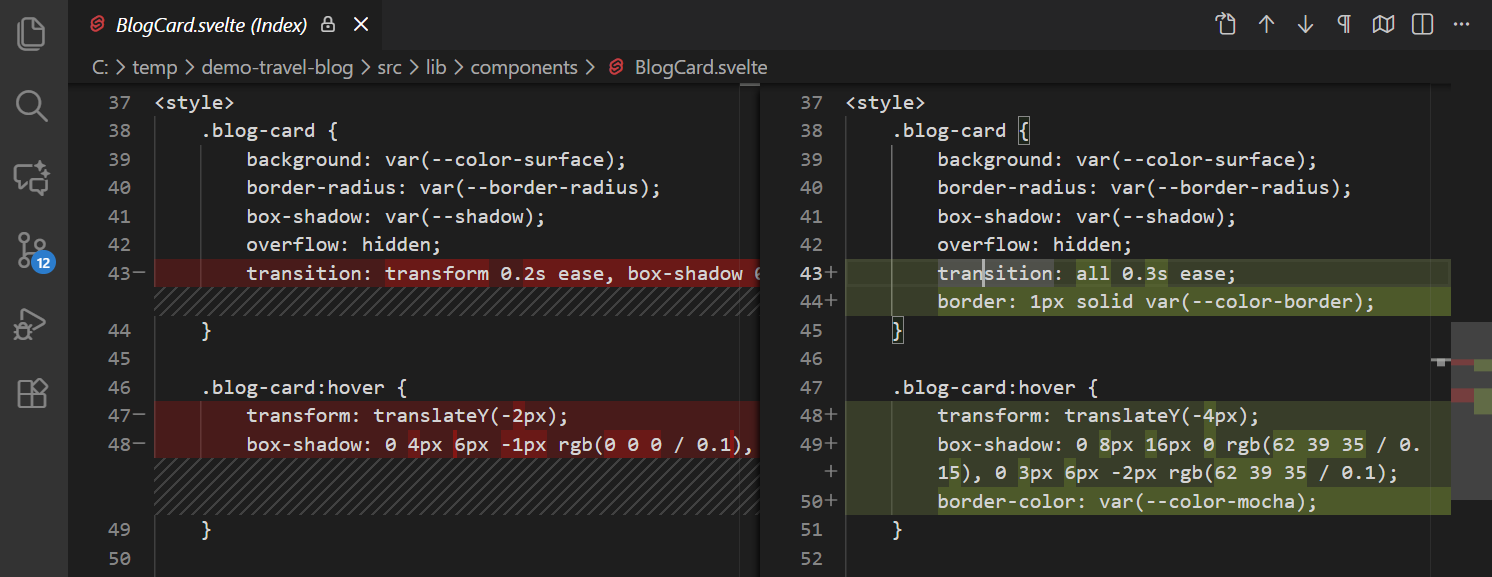
VS Code inline diff — green lines added, red lines removed
Tip
Right-click any hunk to stage only that block — keeps commits focused and logical.
Resolving Merge Conflicts Visually
When git cannot automatically merge two branches, VS Code opens a 3-way merge editor:
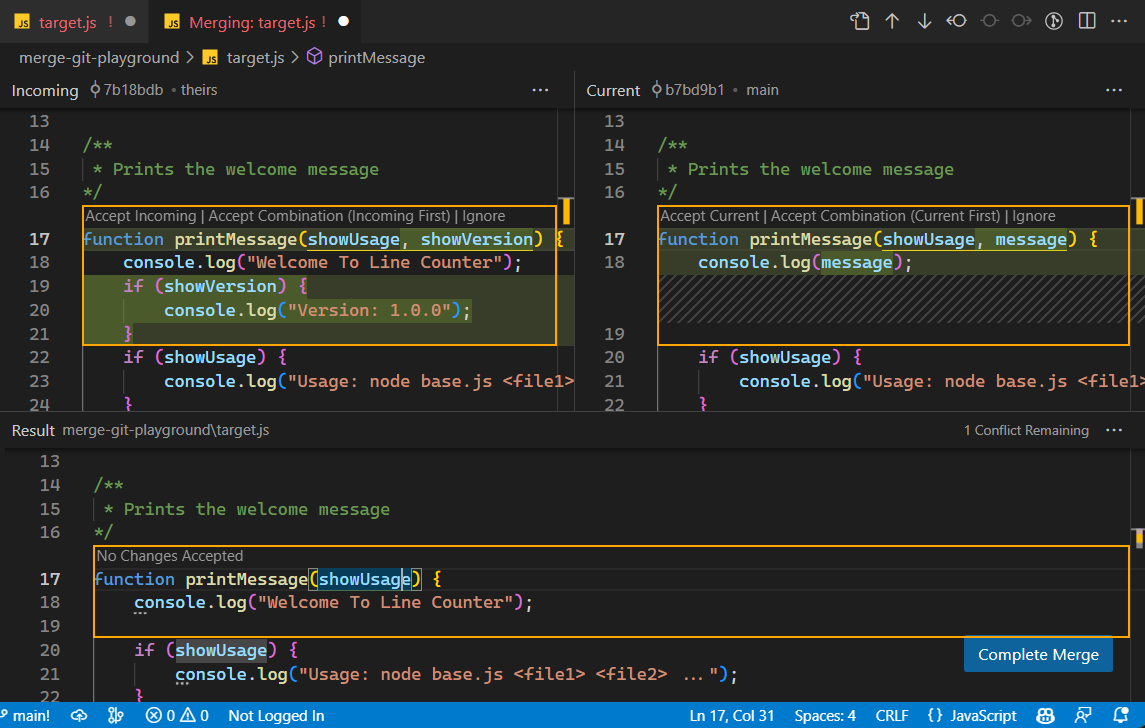
VS Code 3-way merge editor
Tip
Click Accept Current, Accept Incoming, or Accept Both — no manual marker editing needed.
Git Fundamentals
Why Git Matters More Than Ever
Git is your safety net
AI agents make many changes fast. Without git, you cannot know what changed, when, or why — and you cannot undo it safely. With git, every agent action is traceable, reversible, and reviewable.
- Git was important before agents — now it is essential
- Think of git as the audit log of your collaboration with AI
- A good git history lets a future agent (or future you) understand the project instantly
Quick Reference: Core Commands
Pull before pushing
Always pull before pushing, even when working alone. Agents may have pushed to the remote since your last pull.
Inspecting Changes: git diff
Review every agent diff
Before accepting an agent’s work, always run git diff or git diff --staged. Agents are fast but not infallible.
Lines starting with + are additions; lines with - are deletions.
Understanding History: git log
git log --oneline               # one line per commit
git log --oneline --graph --all # visual branch tree
git log --author="Bas"          # filter by author
git log --since="1 week ago"    # filter by date
git log -- src/analysis.R       # history of a single file

# Example output:
# * a3f9c12 (HEAD -> main) Fix NA handling in income variable
# * 8d21e05 Add regression table output
# * 4b0a317 (feature/new-plot) Add density plot for wages
Agents read this output to understand what has been done and what still needs doing.
Branching and Merging
Always work on branches — especially with agents:
Two merge types:
| Type | When | Result |
|---|---|---|
| Fast-forward | No new commits on main since branch | Linear history |
| Merge commit | Diverged histories | Preserves branch structure |
Best practice with agents: one task = one branch = one PR.
Merge Conflicts
A conflict happens when two branches changed the same lines:
<<<<<<< HEAD
model <- lm(wage ~ education, data = wages)
=======
model <- feols(wage ~ education, data = wages, vcov = "hc1")
>>>>>>> feature/robust-se
Edit the file to keep what you want, delete the markers, then:
Tip
git add src/analysis.R → git commit — that’s all it takes to complete the merge.
Useful Git Tricks
Git + Agentic AI
Git as AI Memory
git log= the agent’s memory of what has been done- commit messages = notes from past sessions
- CLAUDE.md / AGENTS.md = standing instructions, committed to git
- branch names = task labels (
feature/add-regression-table,fix/missing-data-pipeline)
A well-maintained git history lets an agent pick up exactly where the last session left off:
How Agents Use Git
A well-configured agent follows this pattern:
- Pull the latest state of the repo at session start
- Create a feature branch for the task:
git checkout -b feature/summary-stats - Make atomic commits after each logical step, with descriptive messages
- Push the branch and optionally open a PR for human review
- Never touch
maindirectly
The Commit-Review Loop
The safest way to work with agents:
You: "Add a regression table comparing OLS and IV estimates"
       ↓
Agent creates branch, writes code, commits
       ↓
You: git diff main..feature/regression-table
       ↓
You review — approve, or request changes
       ↓
Merge to main
Never skip the diff review
Reading git diff before merging is the single most important safety habit when working with AI agents. It takes 2 minutes and prevents hours of debugging.
Safety Practices
Five rules for working with AI agents and git:
- Feature branches only — agents never push directly to
main - Review every diff —
git diffor PR before merging - Pre-commit hooks — auto-lint, auto-format, run tests before any commit lands
- Descriptive commit messages — future you (and future agents) will thank you
- Small, frequent commits — easier to review, easier to revert
Using git log to Brief Your Agent
Start complex sessions by asking the agent to read the log directly:
$ claude "Read git log and summarise what has been done in the last week,
then identify what is still incomplete"
This turns git history into a briefing document — no need to re-explain the project every session.
Running Models: Local and Free Cloud
Local Models with Ollama
- Run large language models locally on your own hardware — free, private, fully offline
- Works seamlessly with OpenCode
- Recommended model for coding: Qwen 2.5 Coder (strong tool-use, good context handling)
macOS: brew install ollama or download the desktop app from ollama.com.
Hardware Requirements
| Model size | RAM needed | Disk space |
|---|---|---|
| 7B | 8 GB | 5 GB |
| 14B | 16 GB | 9 GB |
| 32B | 32 GB | 20 GB |
- CPU inference works but is slow — GPU recommended for 14B+
- On a modern laptop with 16 GB RAM: 7B models run well
- All inference stays on your machine
Connecting OpenCode to Ollama
Add to your opencode.json:
Ollama’s default context window is 2K tokens — too small for coding agents. Increase it before use:
Free Cloud Models
All options below are free except the last:
| Provider | Model | Best for |
|---|---|---|
| Google Gemini Flash | gemini-2.0-flash |
Fast, everyday tasks |
| Mistral Devstral | devstral-latest |
Code-focused tasks |
| Groq | llama-3.3-70b |
Speed |
| Ollama + Qwen Coder | qwen2.5-coder:7b |
Privacy, offline |
| Anthropic Claude | claude-sonnet-4-5 |
Highest quality (paid) |
Getting Started: Free Options
- Go to aistudio.google.com → “Get API key”
- In OpenCode:
/connect google - Set in
opencode.json:
No credit card required. Works from any machine.
Conclusion
Key Takeaways
- Agentic AI transforms how we write and maintain code — you describe goals, agents implement them
- Claude Code and OpenCode are the two leading tools; OpenCode is free and works with local models
- Git is more important than ever — it is the agent’s memory, your audit trail, and your safety net
- Free options exist: Gemini Flash, Mistral Devstral, or Ollama with a local model
- The habit that matters: feature branches, diff review, good commit messages
Getting Started Today
- Install OpenCode:
npx opencode@latest - Connect a free model:
/connect google(Gemini) or set up Ollama - Create a test repository, initialise git, add a CLAUDE.md or AGENTS.md
- Give the agent a task, review the diff, merge if happy
Resources
- Claude Code docs
- OpenCode docs
- Ollama — local models
- Google AI Studio — free Gemini API
- Mistral Console — free Devstral
- Happy Git with R — comprehensive git guide
- Simon Willison on agentic engineering patterns
- Version Control in the Age of AI — git-tower blog
![]()
Version Control in the Age of Agentic AI